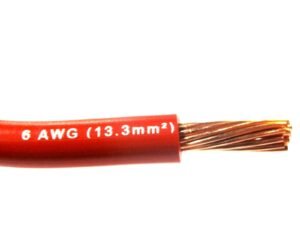
Wire Guide Visual Inspection Method—Check the Printed Markings on the Wire
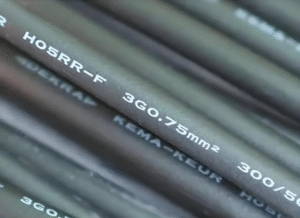
Wires produced by reputable manufacturers feature a printed code consisting of a sequence of letters and numbers along the wire surface. This code can be used to identify the wire’s specifications.
Classic Method—Measuring Conductor Diameter
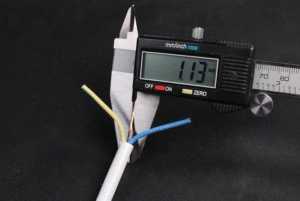
Measuring the conductor diameter and cross-referencing it with a parameter table to identify wire specifications is the most traditional and relatively accurate identification method. Refer to the following parameter table:
| Nominal cross-section(mm²) | Conductor diameter(mm) | Approximate diameter(mm) |
| 1.0 | 1.13 | ≈1.1 |
| 1.5 | 1.38 | ≈1.4 |
| 2.5 | 1.78 | ≈1.8 |
| 4.0 | 2.25 | ≈2.2 |
| 6.0 | 2.76 | ≈2.8 |
Technique Method—Counting Strands and Measuring Single Wires
Flexible wires are primarily composed of multiple fine copper strands. For such wires, the “counting strands and measuring single wires” method should be employed. This approach is particularly suitable for flexible wires like FYRA/B and RVS. Refer to the following comparison table:
| Nominal cross-section(mm²) | Number of Shares | Single-strand diameter(mm) | Calculated cross-section(mm²) |
| 1.5 | 7 | 0.52 | 1.49 |
| 2.5 | 7 | 0.68 | 2.55 |
| 4.0 | 7 | 0.85 | 3.98 |
| 6.0 | 19 | 0.64 | 6.11 |
Important Notes: Inferior electrical wires may contain insufficient strands, potentially leading to overheating during use, melting of the insulation layer, and in severe cases, causing safety hazards such as fires.
Empirical Method—Comparing Known Samples
When to Use the Comparison Method
When measurement tools are unavailable or quick judgment is needed, the comparison method proves most practical. Though reliant on experience, this technique can be mastered even by those without electrical backgrounds through certain skills.
Establishing a Reference Sample Library
Collect leftover materials from renovations or building supply stores to create a wire sample book. Categorize collected materials into thin, medium, and thick sections, clearly labeling each wire’s specifications. This library serves as a reference for subsequent comparisons.
Specific Comparison Methods
- Thickness Comparison: Place the uncertain wire conductor alongside a sample for a direct visual comparison of thickness.
- Hardness/Flexibility: Bend the wires by hand to assess their stiffness. For wires of the same type, larger cross-sectional areas generally yield greater hardness.
- Weight Comparison: Weigh two conductors. Larger specifications typically weigh more. Ensure wires are cut to identical lengths for comparison.
- Visual Characteristics: Insulation thickness, color, gloss, etc.
- Important Notes:
-
- Comparative methods only provide approximate ranges and cannot serve as precise references;
- This approach requires accumulated experience; beginners should combine it with other methods;
Scientific Method Based on Electrical Requirements—Calculating Current Carrying Capacity
Definition of Current Carrying Capacity:
In electrical engineering, we use the specialized term “current-carrying capacity” to express current. It is defined as: the maximum current value (unit: ampere, A) that a wire can continuously carry under specific environmental conditions without exceeding the rated temperature of its insulation layer. Exceeding the rated current value accelerates the aging and melting of the wire insulation, potentially leading to fires and safety incidents.
How to reverse-calculate using current-carrying capacity?
Typically, household appliances have rated power. Based on this rated power and stable household voltage, we can calculate the current (current-carrying capacity) required for normal operation, which helps determine the appropriate wire gauge. This method is particularly suitable during design planning phases, especially in automotive, aerospace, and marine sectors.
Below are the current-carrying capacity formulas and methods:
Single-phase circuit current formula:
Current (A) ≈ Power (W) ÷ 220V
Three-phase circuit current formula:
Current (A) ≈ Power (W) ÷ (380V × 1.732)
Wire Load Capacity Reference Table
Below are safe load capacity reference values for exposed installations at ambient temperature (30°C):
| Wire Specifications
(mm²) |
Current-carrying capacity(A) | Applicable Power Range for Electrical Appliances(约) |
| 1.5 | 14-18 | 3000W Below |
| 2.5 | 18-26 | 5000W Below |
| 4.0 | 26-35 | 7000W Below |
| 6.0 | 35-48 | 10000W Below |
| 10.0 | 48-65 | 15000W Below |
Important Notes: The actual current-carrying capacity must be adjusted based on the wiring length and the power rating of the electrical appliances.
The Most Scientific Identification Method—Measuring Resistance Value
How to Identify Specifications by Measuring Resistance?
The resistance of a wire conductor is directly proportional to its cross-sectional area—the larger the cross-sectional area, the lower the resistance. By measuring the resistance value per unit length (Ω/m), the actual cross-sectional area of the wire can be precisely calculated. This method is the most scientific approach to detect whether a wire is “under-sized” (actual cross-sectional area smaller than the nominal value).
Measuring Tools:
Digital multimeter with 0.001Ω accuracy or DC resistance tester, calibrated standard ruler, clamps.
Measurement Procedure:
- Cut a fixed-length wire segment (1m or 2m);
- Strip 5cm of insulation;
- Roughen the exposed wire strands with fine sandpaper to remove oxidation and ensure good connectivity;
- Measure using the milliohm range of the digital multimeter;
- Calculate using the formula:
- Resistance formula: R = ρ × L (wire length) / A (conductor cross-sectional area), where copper resistivity is 0.0172Ω·mm²/m at 20°C.
- Cross-sectional area formula: A = ρ (copper resistivity) × L (wire length) / R (copper resistivity)
- Provide a reference table for Chinese national standard resistance values. The national standard specifies the rated DC resistance values at 20°C for various wire specifications:
-
Nominal cross-section(mm²) Maximum Resistance(Ω/km, 20℃) 1.0 18.1 1.5 12.1 2.5 7.41 4.0 4.61 6.0 3.08 10.0 1.83
-
Purchasing Tips—Inspect Packaging and Certifications
The Importance of Packaging Information
The outer packaging and certification labels of electrical wires serve as crucial guarantees of product quality.
What Does Packaging Information Include?
- Product Details: Product name, model, specifications, applicable standard number, rated voltage, production date, and production batch;
- Manufacturer Information: Manufacturer name, address, contact details, and trademark;
- Certification Labels: Quality management system certification marks (e.g., ISO9001), production license number, and 3C certification (China Compulsory Certification)
- Verifying Packaging Authenticity:
- Inspect print quality—legitimate manufacturers use crisp, vibrant printing that resists fading;
- Check anti-counterfeiting labels by verifying through official websites or channels;
- Cross-reference details—ensure outer packaging labels match wire markings;
- Confirm manufacturer details—reputable suppliers provide complete product information for verification;
Important Notes:
- Purchase through authorized channels: Acquire wires from reputable building material markets, brand specialty stores, etc.
- Retain purchase documentation: Safeguard invoices and receipts for potential future claims.
- Confirm packaging integrity: Ensure product packaging shows no damage, contamination, or tampering.
- Check production date: Long-stored wires may exhibit degraded insulation performance due to storage conditions and duration.
Professional Measurement Methods—Utilizing Specialized Tools
Advantages of Professional Tools
Using professional tools effectively enhances efficiency and accuracy. Common specialized tools include wire gauges, digital wire diameter meters, micro-ohmmeters, Source/Force, Sense/Detect, and cable identifiers.
Tool Selection Recommendations:
Home Users: Equipping with vernier calipers or wire gauges suffices—low-cost and highly practical;
Renovators: Consider a digital wire gauge tester to significantly boost work efficiency;
Professional Electricians: Equip with precision instruments like micro-ohmmeters as needed;
Quality inspectors: Require a full suite of equipment, including resistance testers and insulation resistance meters. Select appropriate devices based on specific operational environments.
Precautions:
- Clean equipment regularly and calibrate according to annual calibration schedules.
- Protect electronic instruments from moisture and shock; store in temperature-controlled environments.
- Read equipment manuals thoroughly. Use correct measurement techniques and avoid rough handling of instruments.
Auxiliary Identification Technique—Wire Color Identification
Significance of Wire Colors
The color of each wire type is based on established standards, with national specifications defining the meaning of different colors. Wire colors provide auxiliary functionality for identifying wire functions.
- Standard Color Specifications: National Standard GB/T 6995.2-2008:
- Primary Color Series:
- Yellow, Green, Red: Live wires (phase conductors) in three-phase circuits;
- Blue or light blue: Neutral conductor (neutral wire);
- Yellow-green bicolor: Ground conductor (protective conductor);
- Auxiliary colors: In certain multi-core cables, colors like black, white, brown, gray, etc., may be used alongside primary colors to distinguish different circuits;
How to Use Colors to Assist in Identifying Specifications
- Within the same cable: Wires of different colors may have different specifications. For example, in a three-phase four-wire cable, the three live wires may be 4mm², while the neutral wire may be 2.5mm². However, the ground wire is typically one gauge smaller than the phase wires but should not fall below a specific minimum value.
- Within a distribution system: Different circuits may use distinct colors for identification. For instance:
-
- Lighting circuits: Often use white or yellow wires;
- Outlet circuits: Often use red wires;
- Dedicated circuits: Such as for air conditioners or water heaters may use specific colors.
Comprehensive Analysis Method—Integrating Multiple Techniques
Why Comprehensive Analysis is Necessary
While each identification method mentioned targets wires produced by reputable manufacturers, the market still contains numerous non-standard wires. The comprehensive analysis method provides a clear approach to identifying the specifications of non-standard wires. Comprehensive analysis is a scientific method that verifies through multiple techniques to reach accurate conclusions.
Comprehensive Analysis Steps
- Step 1: Preliminary Observation
-
- Inspect printed markings on the wire: Record all information;
- Examine overall appearance: Conductor hardness, glossiness, and insulation texture;
- Verify packaging and certification details (if available).
- Step 2: Physical Measurement
-
- Use a vernier caliper to measure conductor diameter (single-strand wire) or individual strand diameter (multi-strand wire);
- Calculate wire cross-sectional area using the formula;
- Conduct tactile test: Bend the wire to assess hardness;
- Compare with known samples (if available).
- Step 3: Electrical Testing (if feasible)
-
- Calculate resistance per unit length;
- Determine cross-sectional area using electronic instruments (wire gauge or digital wire diameter tester);
- Compare results with physical measurements.
- Step 4: Comprehensive Evaluation
-
- Compare results from all measurement methods;
- Verify consistency: All results should be similar;
- Make final determination: If inconsistent, rely on the most reliable method (e.g., resistance measurement).
Conclusion
Based on the above ten measurement methods, you can establish a suitable testing process according to your needs and conditions:
Simplified Process (Home Users): Check printed markings → Measure diameter → Compare samples → Draw conclusion.
Standard Process (Construction Foremen): Check printed markings and packaging → Measure diameter → Count strands and measure single wires → Conduct tactile test → Compare samples → Draw conclusion.
Contact us immediately to learn how we can meet your cable and harness requirements. Follow us on Youtube or Facebook.